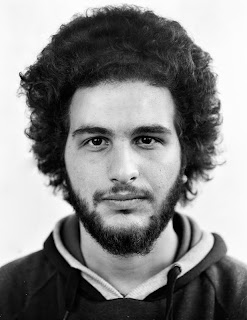
John's CS4 Version

My CS4 Version
Background:
To my fellow students - try large format if you haven't already. It can produce fantastic results.
As part of the 'People' assignment I wanted to try different camera
formats. John very kindly arranged a workshop on Large Format Cameras at short notice.
The Camera:
The camera we used was a Cambo. This is a mono rail camera with two planes that work independently of each other. There is a viewing plane and a focusing plane, joined together by the bellows, normally set parallel to each other.
So what are the benefits of Large Format:
There are 3 main benefits of using Large Format Cameras. The size of the negative is 5 inches by 4 inches. This is a big bad boy of negative compared to the standard 35mm negative. The 5 x 4 negative can be enlarged to poster size with very little loss of definition, although the FX size sensor on DSLR is not that far off the definition of 5 x 4. Secondly due to the flexible movement from this type of Large Format Camera, perspective can be controlled. This is achieved by the tilt and shift control on the side of the camera. This effectively shifts the focusing plane up or down, or from side to side from the stationary viewing plane. So effectively when looking through the focusing plane you can move the image to the top or bottom without tilting the camera. The result of all this means the camera can be adjusted up or down, left to right without parallel lines of the subject appearing to converge. The third benefit is depth of field, by using swing and tilt control the depth of field is improved by the lens being able to get closer and parallel to the subject. Think of an accordian, the camera bellows act the same way by bending closer to the subject.


The set up:
The postion of the model (George) was back facing a white wall seated on a chair. To his left was a large sunlit window and to his right was a studio light at 45/45, set to continuous light. The camera was mounted on a tripod set at head height aimed at the model.
John explained the operation of the camera - focusing and apature control. It's probably best at this point to explain what you see through the viewing plane. Everything is upside down! Moving the tripod to the left means the image does the opposite. This is just one of the things that makes your working practice slow down - for good reasons! Taking an incident meter reading (light measured from the model pointing towards the camera), then stopping it down by 1 stops, as it's best to over expose for large format. This gave a setting of F8 at 8th of a second. For this shot we wanted the most shallow depth of field on offer without effecting quality. Focusing the type of camera is a bit more mechanical than DSLR. Firstly you have to lock open the shutter so that the image is displayed on the viewng screen. Focusing is achieved by moving the front plane forward/backward along the monorail. This is the fun part as you get to wear a black cape over your head to blockout the light making the image visable on the viewing plane. The use of a loupe magnifier is used for fine adjustments. The Shutter is then closed, the lens is set for speed and apature. The film is loaded in the back of the camera via a film holder. These hold two 5 x 4 negatives only protected by a thin peice of metal the size of the film called a darkslide. When you and model are ready, it's just a case of pulling the dark slide out and firing the shutter. That's it !! (remembering to return the darkslide to the holder).
Developing:
The 5 x 4 negative is extremely sensitive and delicate. We developed 1 negative at a time, unlike medium format or 35mm where you are developing a whole roll. Due to the size of the neg we used metal trays (metal does not tend to scuff the negative) for developer 4 minutes, stop bath 1 minute, fixer 5 minutes and wash 20 minutes. As stated above these negative are delicate - only handle by the edge and don't over agitate.
Photoshop:
I have not as yet printed this neg, but scanned the neg straight to photoshop (thanks to Katy for help with this). The neg did have some water marks as I was slightly impatient and also did not use wetting agent at the end of the process (lesson learnt). Katy did show me some quick CS4 adujstment to improve the final image. With this I took the raw file and made my adjustment to the finished image.
My version:
1. As the image had been deliberately overexposed I brought the exposure back with the use of the curves tool.
2. The top of the hair was slightly light - I made this darker by burning in with the burn tool.
3. As there were streaks to the middle and left of the face I masked this off. Then using brush tool I started to bring the detail back into view.
Thats it - all that just for one image - but the tonal quality as John put it, just can't be captured by DSLR's.
Johns Version:
1. John started with the Dust & Scratches filter. This take away some of the detail. This was the equivelant of me masking the image.
2. Increasing the brightness to 50% and contrast to 75% via the Brightness and Contras tool the image starts to show increased detail but slightly whitens the skin. This is due to the HP5 film used which tend to give all subjects white skin.
3. Finally, using the blending tool the top 10% and bottom 10% of the picture were darkened
This took John all of about 5 mins - My version took me half a day doooh!!
Learning Outcome:
1. Large format is a slow methodical process but no less enjoyable than DSLR.
2. You have to double check all settings - You only get two negatives per darkslide! With DSLR you can fire off as many shots as you want, adjusting as you go.
3. Be patient - rushing the film processing can ruin a good days shoot. Always use wetting agent at the end of the washing cycle. It takes less than a minute, but save on streaks.
4. Be extremely careful when loading film into the darkslide. Also when processing. I got 3 lovely clip marks from the hanger when drying the neg off, luckly this was cropped off the final image.
5. If you like large format get use to working in the dark!