Background:
A number of students and I organised a practice day to use studio lighting. We wanted to practice light set ups for our 'people' assignment. We had just gone thought the process of researching the different genres of portrait photography and now it was time to emulate some of those examples. The actual images were not the important factor as they would show little of the human condition. The most important was to get the right look for our future projects.
Set up 1:
We had all agreed that we wanted to experiment with Low Key. The diagram above show the simple set up. We had 1 studio light set to continues lighting with a medium size diffuser set at 45/45, with the camera facing the model. This was a technique we all had used in semester 1.
The image above is just one from this session. The lighting is ok but the image is a little flat. A second light adding highlights would have just lifted this image.
Set up 2:
This set up was similar to set up up 1 but with the light coming from behind at a 45 degree angle. We just were experimenting to see what difference the light would have on the model.
Yet again we learnt something here. The light from the back does exactly what it should, light the back of the model. However, the face area is dark and dull. On reflection we should have used a modifier for more dramatic light to the the rear and balanced a second light with diffuser to the front.
Set up 3:
As the above experiments had not really given us what we were after it was time to experiment further.
We had realised that one source of light was not giving the dynamism required. We still used one light but bounced the light source back with a white reflector. To absorb any tray light we positioned a black panel in between the light and reflect as show above. We were still looking to light one side of the face with the other side dark.
This was closer to what we were striving to obtain. The face to one side is lit but has the extra elements of light reflected to create subtle highlights. The shot in lightroom show this a lot better than here on the blog.
We experimented a little further with this set up. We introduced a fluorescent daylight from the left. We had two different colours of light here. Tungsten warm and orange in colour to the fluorescent colder bluer light. This didn't quite work as the contrast of light was too extreme. However, when converting this in lightroom to greyscale, the colours are made redundant but the tone from the daylight add a dramatic highlight.
Time for a change:
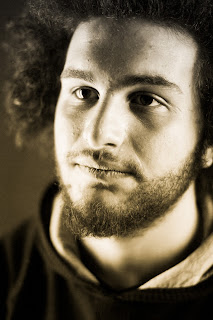
This final set up was something George had wanted to recreate after attended a lighting lecture from Andy. However, it didn't seem to work. We went back to basics and set up one light at a time to see the effect. This was a better way to work and we got to what George was trying to show us.
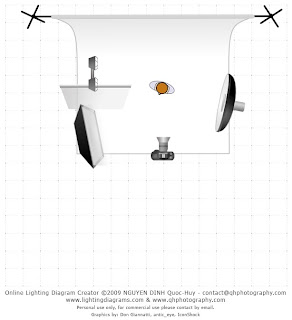
We had three lights, beauty dish to the right a 45/45 aimed at the top side of the face. The second light was a softbox to the left with a fluorescent light also to the left. This was screened by a foam board to shield stray light. The following images show the images being built up by light source.
The first light source was the lightbox from the left. Next light to be added was the fluorescent daylight, followed by the beauty dish. We ran out of time before really experimenting with the strength of lights. However, what can be seen is the thin strip of detailed highlight running down the left hand side of the model. The beauty dish needs to be turned up to balance the light on the face to the right as it is a little dark.
Learning Outcomes:
1. This day was all about experimenting with light. Some of these set ups just didn't work. However, the learning curve was superior to if we had stumbled on to the most amazing light set up at the first go. Recreating it would be very difficult without fully understanding why it worked in the first pace.
2. It was a great exercise not to concentrate on framing or posing but just to concentrate on the way the light effects the model.
3. I have learnt so much form these experiments, this really gave me the impetus to try more set ups to see how they work.
Contact Sheet:
Tuesday, May 25, 2010
Spooks Apprentice - Downham
This is the second set of images that have been inspired by the writings of Joseph Delaney - Spooks Apprentice. In book four 'The Spooks Battle' young Tom and his master travel to the district of Pendle to sort out the witch clans. They are sheltered by the local priest of Downham village.
As with the first set of images I wanted to re-create the atmosphere described within these books, hence the dark, moody and eerie manipulations to the final images. However, I am not that happy with the images. The weather on the day of the shoot was sunny and bright, not the best for my intentions. Due to the fine weather there were more people and cars around the village - what can you do! I should have chosen a different day, but I had arranged to take a fellow student who is from Greece and show him a different part of Lancashire.
The image above is of the small row of cottages at the top of the hill in the village. These cottages typify the style of building as described in the 'Spooks Battle'. I have adjusted the image with the 'Selenium Tone' preset and added a strong contrast curve, and then brightening the image with the tone sliders. I used a 20mm wide angle lens, I wanted the picture to be sharp and have a lot of detail, so chose F11 ( I had read the f.11 to f.16 offer the best sharpness with landscape photography). The speed was fairly high due the the brightness of the day 400th sec with the f.stop chosen. The one downside to this image is the vapour trails left by aircraft.
This next image was taken due to the fact all the chimney pots were all still intact, which with modernisation is hard to come across. I have used cyanotype to creates the atmosphere and due to the extremely bright blue sky I thought this effect would suit. I used a zoom and small aperture to capture detail. Focal length 70mm and f18, speed 100th sec. The second image was taken for the distant view of the church. I also like the horizontal lines created by stone wall, wooden fences and buildings. I wanted to try a different effect but keep the same mood. I have de-saturated the colour to obtain the aged look.
The next two images are of the village looking up from the small village green. I have converted to greyscale to loose a bit of clarity and detail, due to cars and people, also to keep within the theme. I also wanted to capture the dominant church at the top of the image.
The next series of images are all taken around the church itself. The first image is of the tower. I really don't like this shot but have include it to show the dreadful shadow that has been cast to the right hand side. This has taught me a lesson - always look for the shadow on bright sunny days. I have taken the second image to show what the parishioners of Downham would be greeted with on being released from Sunday service. I also though it was a good way of showing Pendle Hill which features heavily in this story.
With this image I have purposely captured the branches of the tree in frame, I like the shadow that has been cast by them. I have converted to greysale to add to the mood. I chose a slight angle to give the image drama. The second image is of the front of the church. As the ground to the front slopped away I was able to obtain a view looking slightly upwards.
People - Enviromental
Unfortunately I am not going to put a blog up for this section of the People module. I will hand in a paper format for assessment.
Candid Portraits - Derek the Master Farrier
Background....
So what is a Candid Portrait? After searching the Internet and finding a whole host of explanations as to what is and what's not candid photography I was none the wiser. At the planning stage of this module I had looked at the work of Weegee for the candid category.
In the above photographs taken by Weegee you can see they have been taken without any direction from the photographer, but the subjects in the photograph know of his presence and what he is doing. They are totally spontaneous in their actions and its down to the photographer when to press the shutter.
For the Candid Portraits I was lucky enough to capture and record a master craftsman at work. The gentleman's name in question was Derek. Now into his seventies he still has the skill and stamina to make many a young Farrier green with envy. His foundry is on the border of Herefordshire and Worcestershire, in an out building on a farm. Lit by a mixture of fluorescent and daylight, and the glow of the intense foundry fire. The only direction I gave him was to work as normal as if I wasn't there.
This first image is actually the last image I took at this session. Derek was just chatting away and just looked up at an opportune moment, I was fairly close at the time and the backgrounds were somewhat confusing. You will see in some of the other images the wires and metal covers which distract the eye. I also used a shallow depth of field f2.2 to further omit detail in the background. This image is slightly soft which I thinks adds to the overall feel.
I wanted to give the impression that I was not always focused on Derek and so took certain still life objects within the forge. I also wanted to use the new found skills form the first module and carry them over into this. The second image is the starting of the fire in the forge. There is an image below that shows it at full force. I used a slower shutter speed to create the sense of movement within the flames.
I took these next two images of Derek to show the heat of the metal being worked. I also liked the glow that can be seen in his face. I struggled with light throughout this session, I had to use a shallow d.o.f to allow more light to hit the sensor as I needed a fairly fast shutter so that the images didn't blur.
With the second object image I saw a number of horseshoe blanks laid on the floor next to the forge, I was taken a back by their blue colour. The final image has been cropped to tidy up the edges and help draw the viewers eye into the centre of the composition.
Another shot showing the total concentration of Derek.
This next image is of the large metal tongues positioned next to the forge. They are used to position the metal in the fire to get to temperature before working. I took this image dropping the focus to the foreground and background, creating a clear sharp area of focus in the centre of the composition. I captured the image along the length to draw the viewers eye to the centre and help to produce an abstract image. The image on the right show the concentration of Derek working the metal. I used a fast shutter speed to capture the motion of the hammer. If I was taking this image again I would slow the shutter down to create increased motion within frame.
With this shot I was able to capture shards of metal sparking off the forge. This is the kind of image you expect to see from a farrier.
Another shot showing the total concentration of Derek.
I saw the above wording hanging in the store room next to the forge. I liked the way the light caught the edge of the word and then the dark metal work against the very light background. I used a shallow d.o.f as the store room had tools hanging against the wall which would have caused a distraction.
The final image was take to show the intensity of the forge fire. I have turned up the saturation to bring out the wonderful colours that can be seen in this image.
Learning Outcomes:
1. Some of these images are slightly soft. This is due to me not being very observant. I had just bought a Sigma 28mm prime lens and was itching to use it. This lens has a known problem of sometimes not auto focusing properly. Lesson learnt - always check your equipment before and while the session is taking place.
2. Another rookie error. We think of Farriers/Blacksmiths wearing used leather aprons, with the shirt sleeves rolled up, not cardigans. I could/should have got Derek to wear his protective clothing as it would have given more credibility to the images, but this could have been classed as direction!
3. Have a plan of action. I should have researched a bit more for images of Farriers/Blacksmiths and had more of an idea of what I wanted to achieve. This would help in being more creative.
4. I learnt something about myself with this shoot. Altogether I enjoyed the experience but I realised I preferred the controlled environment of the studio. As I turned up with my camera and little else I didn't enjoy not being in control of where the light would fall. Just a personal preference!!
5. Sometimes its not possible to see the location before the shoot. However if you can do some prep then do. If I had know how dark the Forge would be then I would have looked a bringing lights. However, is this then moving out of candid into environmental?
6. I could have converted all the images to grayscale to reduce the distraction in clothing and backgrounds. However, I think this would loose some of the intensity of light and heat that have been caught within frame. Also trying to keep within the spirit of Candid photography I have tried to make little or no alteration to the captured image.
Places - A Familiar Place
Albert Renger-Patzsch
For this part of the 'Places' module I wanted to take the influence from one of the early 'New Objectivity' photographers - Albert Renger-Patzsch. I have become particularly interested in any photographer who followed this genera of photography since researching the subject for the case study, wanting to link this research to the photography modules for this semester. Patzsch along with Karl Blossfeldt and August Sander created a new way of photographing where the object being photographed was the central element. Within their respective compositions there was no room for subjective interpretations.
Familiar Place - Date of capture 16th February 2010 8.50am, Camera Nikon D300
With this in mind I had identified a wood I use to play in as a child in my home town of Worcester. At a visit at half term the perfect conditions presented themselves - slightly foggy!
Due to the influence of Patzsch I intended to capture in colour and convert to greyscale in Lightroom/CS4. I purposely set out to look for images that would convert well to greyscale. I was trying to imagine in my head what the compositions would look like in black and white. I was particularly seeking increased tonal range between light and shade.
ISO 280 28mm f.5 Sped 125th Sec
For this photo session I decided to use a standard prime lens (cropped sensor - equivalent to 50mm lens) try to keep to the feel of Patzsch images. I also wanted the highest quality of image within the light restraints. With this first image (above) I chose a lowish depth of field taking direction from Patzsch images.
ISO 400 28mm f.5 Sped 80th Sec
The first image was slightly darker than I wanted, so I adjusted the Quality down to 400 ISO. I also allowed more light to hit the sensor by slowing the shutter speed down to 80th sec. I composed this shot due to the number of different tree trunks and the varying tonal range seen. I particularly liked the fog in the background that just lightens the density of the wood.
ISO 400 28mm f3.2 Sped 125th Sec
I came across this wind blown tree stump with the light coming from the back and left, being diffused by the fog. I composed the shot so that the trunk of the tree guides your eyes into the center. I would have preferred a little bit more foreground interest. As there was quite a lot of background confusion within dense woodland I decided on a shallow depth of field so the focus mainly highlights the trunk - the main component of the composition.
ISO 400 28mm f3.2 Speed 125th Sec
As I was about to leave the wood I passed an Ivy bush that was just capturing the light. As this composition was looking down I chose a shallow depth of field so that the background didn't distract the main subject from the final image.
ISO 400 28mm f5 Speed 125th Sec
The final image was taken for the varying tonal quality that snowdrops provide if converting to greyscale. I chose a fairly low depth of field along with composing the shot to give the impression that this was a large patch of flowers. This is probably to much subjectivity for 'Objectivity' purist but you have to experiment!!
Learning Outcome:
1. When the correct weather conditions present themselves you have to take your opportunity.
2. Taking inspiration from masters of photography and trying out their particular style helps with
3. Purposely going out to capture black and white images focuses the mind and helps identify the opportunity in situ rather than at the end of the shoot when sifting through images on a computer.
Contact Sheet:
Commercial Portrait - The Principle
For this section of the 'People' assignment I wanted to push the boundaries and work out of my comfort zone. I didn't realise at the time how much out of my comfort zone I would be working! The whole point of a Corporate Portrait is to identify someone of importance at a recognisable establishment.
I sent a letter to the Principle of Blackburn College Mr Ian Clinton who very kindly agreed to come and have his portrait taken.
Creative Idea
I wanted to create an image that had the atmosphere of Caravaggio's paintings. His use of the chiaroscuro is fascinating and always heightened the depth to his compositions.
The Calling of Saint Matthew 1599 - 1600 Caravaggio
I also wanted to portray the significant weight of responsibility that this type of role has and the character you must have to lead an establishment such as Blackburn College.
Planning
So I now had the model and I new what look I wanted to achieve. It was time to make a decision on location. Two things happened in a short space of time. Firstly I had been discussing some of my ideas with John, and secondly Andy had taken a small group of students to practice lighting outside the studio. Both these elements pointed to a location of the atrium at the University centre. For the envisaged composition, as well as the Principle I need a number of students for the background. For this I contacted the Student Support service at Blackburn College. I briefed them that I was looking for around 8 students of different social and cultural backgrounds. It was felt that the Principle would like to portray Blackburn college as an all inclusive education establishment.
I was given two dates by the principles secretary. I chose Friday 26th March due to it been a quieter day a Uni.
At this stage I informed security what I was doing and John informed Student Support at UCBC. So everything was book everybody had been informed - or so we though, more on this later.
Practice
Originally I had planned to use the Large Format Camera to capture this image. However, as I got closer to the day and the importance of the shoot started to hit home I gave in to better judgement and decided on DSLR. As no one from the photography dept had taken the Principles photograph I wanted to set a good example, this did start to put a little pressure on. John had suggested it would be a good idea to have a practice session on the Wednesday. He also suggested that it would be a good idea to have an assistant to help on the practice day and the day of the shoot itself. Chelsea very kindly volunteered on the Wednesday and Sarah on the Friday. I got in touch with Student Support and asked if they could get hold of the students for a practice session on the Wednesday.
Wednesday Practice
The set up for this practice session was as Andy taught to some of the students a few weeks before. Two lights were used, one at 45/45 degrees about six foot high. The second was 90 degrees at waist height. The atrium window as the background.
Set up
1. Meter the background through the camera. Set shutter speed 125th second and set ISO 200. Take a picture. Look at the image, at this stage you want to select the aperture. I wanted the detailed contrast background. Keep taking an image and shutting the aperture down until the desired image. This is normally around f22, the more experienced photographers would go straight to this f stop. This was a good exercise to see what the different aperture make.
2. 1st light a 45/45 - stand model in position. Turn the power to the highest setting, using a handheld light meter take a reading of the models face. Compare this reading to the background metering taken through the camera. Adjust the 45/45 light until the meter reading matches the background reading.
3. The second light is really only adding a highlight to the side of the model. Yet again turn the light on to full power. Take a meter reading, adjust the light until it matches the background reading and light 1.
This is the basic set up. You can now adjust the power of lights 1 and 2 until you get the desired effect.
It is worth a mention at this point the 1st light 45/45 has a lightbox on it the second has a lightbox but has the front cover removed. This then can be masked to give a thin panel of light down the side of the model.
The images below are using this set up:
Camera Nikon D300 Camera Nikon D300
125th Sec 125th Sec
f22 f22
ISO 200 ISO 200
28mm Prime Lens 28mm Prime Lens
The Big Day
Set Up
The set up was the same as the Wednesday practice but with an added third light with umbrella. As we had to change the direction of the set up from one window of the atrium to the other we need a bit more light to highlight the background model.
I went through the same stages as on the Wednesday practice i.e metering the background etc. From analysing the Wednesday practice shots I turned down the second masked light reducing the highlight to the left hand side as I didn't like the shadow it cast under the chin. This was a decision I later regretted. Please see the practise shot below:
The actual shoot
I fell into a trap, I let things get to me a little bit here. I was annoyed that I had to change location which was not as good a backdrop as the other window and knew it would effect the final images. I had set the f stop to f8 see the image above, as I didn't like the background and wanted to lose detail. I balanced my light all to this setting. F8 is not enough and I would have been better balancing to f22 as the whole background would have been darker and more dramatic, and this would have led to the loss of detail I thought.
Learning Outcomes:
1. As the saying goes 'Best laid plans of mice and men' - it is not always going to go as planed. As a photographer you have to be adaptable. This is were the creative skill aligned with technical skill comes to the fore. I knew the background was not what I wanted, rather than except it, work creatively around it to achieve a look that you feel is acceptable.
2. People will let you down! have a plan B.
3. I have learnt a fantastic lighting technique, learn to use it before trying to adjust it.
4. I did achieve one element of the objectives I set myself. I did work out of my comfort zone and I thoroughly enjoyed it, It has given me the thirst to try more.
5. I gained a huge amount of experience form this shoot, from health and safety (cordoning off areas), to organising models and locations, but most importantly experiencing of this type of shoot. I feel I have gained confidence and will now put my hand up for Student Union jobs that might come around.
6. Always be on the look out for glare reflections when glass is involved in the background.
Big thanks to John for stepping in at the last minuet to assist me on this job. And before anybody asks, no he didn't tutor me throughout else the pictures would have been a lot better!
Contact Sheet:
Subscribe to:
Posts (Atom)