Showing posts with label Places. Show all posts

Tuesday, May 25, 2010

Spooks Apprentice - Downham


This is the second set of images that have been inspired by the writings of Joseph Delaney - Spooks Apprentice. In book four 'The Spooks Battle' young Tom and his master travel to the district of Pendle to sort out the witch clans. They are sheltered by the local priest of Downham village.
As with the first set of images I wanted to re-create the atmosphere described within these books, hence the dark, moody and eerie manipulations to the final images. However, I am not that happy with the images. The weather on the day of the shoot was sunny and bright, not the best for my intentions. Due to the fine weather there were more people and cars around the village - what can you do! I should have chosen a different day, but I had arranged to take a fellow student who is from Greece and show him a different part of Lancashire.

The image above is of the small row of cottages at the top of the hill in the village. These cottages typify the style of building as described in the 'Spooks Battle'. I have adjusted the image with the 'Selenium Tone' preset and added a strong contrast curve, and then brightening the image with the tone sliders. I used a 20mm wide angle lens, I wanted the picture to be sharp and have a lot of detail, so chose F11 ( I had read the f.11 to f.16 offer the best sharpness with landscape photography). The speed was fairly high due the the brightness of the day 400th sec with the f.stop chosen. The one downside to this image is the vapour trails left by aircraft.


This next image was taken due to the fact all the chimney pots were all still intact, which with modernisation is hard to come across. I have used cyanotype to creates the atmosphere and due to the extremely bright blue sky I thought this effect would suit. I used a zoom and small aperture to capture detail. Focal length 70mm and f18, speed 100th sec. The second image was taken for the distant view of the church. I also like the horizontal lines created by stone wall, wooden fences and buildings. I wanted to try a different effect but keep the same mood. I have de-saturated the colour to obtain the aged look.


The next two images are of the village looking up from the small village green. I have converted to greyscale to loose a bit of clarity and detail, due to cars and people, also to keep within the theme. I also wanted to capture the dominant church at the top of the image.


The next series of images are all taken around the church itself. The first image is of the tower. I really don't like this shot but have include it to show the dreadful shadow that has been cast to the right hand side. This has taught me a lesson - always look for the shadow on bright sunny days. I have taken the second image to show what the parishioners of Downham would be greeted with on being released from Sunday service. I also though it was a good way of showing Pendle Hill which features heavily in this story.


With this image I have purposely captured the branches of the tree in frame, I like the shadow that has been cast by them. I have converted to greysale to add to the mood. I chose a slight angle to give the image drama. The second image is of the front of the church. As the ground to the front slopped away I was able to obtain a view looking slightly upwards.


The last two image are taken on the pathways leading to and from Pendle Hill. In the story the author describes these pathways and they add quite a bit of drama to the plot.


Contact Sheet:


Places - A Familiar Place

Albert Renger-Patzsch


For this part of the 'Places' module I wanted to take the influence from one of the early 'New Objectivity' photographers - Albert Renger-Patzsch. I have become particularly interested in any photographer who followed this genera of photography since researching the subject for the case study, wanting to link this research to the photography modules for this semester. Patzsch along with Karl Blossfeldt and August Sander created a new way of photographing where the object being photographed was the central element. Within their respective compositions there was no room for subjective interpretations.


Familiar Place - Date of capture 16th February 2010 8.50am, Camera Nikon D300

With this in mind I had identified a wood I use to play in as a child in my home town of Worcester. At a visit at half term the perfect conditions presented themselves - slightly foggy! 

Due to the influence of Patzsch I intended to capture in colour and convert to greyscale in Lightroom/CS4. I purposely set out to look for images that would convert well to greyscale. I was trying to imagine in my head what the compositions would look like in black and white. I was particularly seeking increased tonal range between light and shade.


ISO 280 28mm f.5  Sped 125th Sec

For this photo session I decided to use a standard prime lens (cropped sensor - equivalent to 50mm lens) try to keep to the feel of Patzsch images. I also wanted the highest quality of image within the light restraints. With this first image (above)  I chose a lowish depth of field taking direction from Patzsch images.


ISO 400 28mm f.5  Sped 80th Sec

The first image was slightly darker than I wanted, so I adjusted the Quality down to 400 ISO. I also allowed more light to hit the sensor by slowing the shutter speed down to 80th sec. I composed this shot due to the number of different tree trunks and the varying tonal range seen. I particularly liked the fog in the background that just lightens the density of the wood.


ISO 400 28mm f3.2 Sped 125th Sec

I came across this wind blown tree stump with the light coming from the back and left, being diffused by the fog. I composed the shot so that the trunk of the tree guides your eyes into the center. I would have preferred a little bit more foreground interest. As there was quite a lot of background confusion within dense woodland I decided on a shallow depth of field so the focus mainly highlights the trunk - the main component of the composition.


ISO 400 28mm f3.2 Speed 125th Sec

As I was about to leave the wood  I passed an Ivy bush that was just  capturing the light. As this composition was looking down I  chose a shallow depth of field so that the background didn't distract the main subject from the final image.


ISO 400 28mm f5 Speed 125th Sec

The final image was taken for the varying tonal quality that snowdrops provide if converting to greyscale. I chose a fairly low depth of field along with composing the shot to give the impression that this was a large patch of flowers. This is probably to much subjectivity for 'Objectivity' purist but you have to experiment!!

Learning Outcome:

1. When the correct weather conditions present themselves you have to take your opportunity.

2. Taking inspiration from masters of photography and trying out their particular style helps with 

3. Purposely going out to capture black and white images focuses the mind and helps identify the opportunity in situ rather than at the end of the shoot when sifting through images on a computer.


Contact Sheet:


Dolhendra - Wilderness


Continuing the theme from the 'Familiar Place' set of photographs, I continued with the influence of the Becher School of photography. The photograph above was taken by Simone Nieweg. She was a student of the Bechers at Dusseldorf Academy, but the second generation of students after Struff and Gurskey. She had all the characteristic of New Objectivity, taking images of suburban  German allotments, an unspectacular subject but produced fascinating images. I particularly liked the image above due to the colour highlights that can be seen on the ground from the sunlight.

The image below is more typical of Neiweg's work.


With this in mind a had a trip organised at Easter to go to North Wales in and around Lake Bala. I had planned this trip to take the Wilderness section of the Places module. With the Familiar Place I had been looking for tonality within the composition so that it could be converted to greyscale.
With this module I was looking for colour that spotted/highlighted unusual natural shapes and form.


From where I was staying there is a fantastic woodland area with a small river running through it. On one of  my many walks through it I saw this lime green moss growing everywhere in the undergrowth. This can only be seen at this time of year due to the wood's canopy allowing more sunlight through.
With this image I wanted to continue using the compositional technique of creating foreground interest that then leads the eye into the middle of the composition. 

Its also worth mentioning at this point that I have applied a new photoshop technique with this set of images. I had been researching the use of HDR and looked at the pro and cons. I came across an article on Fake HDR and how this could be created quite easily in CS4. I have not applied the acid look that seems quite popular but looked just to give these image a lift with the use of the dynamic range. 

The above shot was taken with a 18mm to 70mm zoom lens on a D300. The choice of camera and lens was taken to give me the greatest flexibility. As stated above I was looking for unusual shapes and colour but still trying to be objective. Due to the darkness of the wood I chose a medium ISO. The focal lenght for this shot was 40mm, I wanted as much of the background in focus so I chose  f.stop of f10 speed 100th Sec.


This image was exactly what I was searching for. The sunlight just spots the ground. There is a strong contrast of colour between the vivid green moss and the reddish brown of the track. The track helps draw the eyes into the centre of the image, which is also helped by the light background that can be seen in the middle of the image before darkening towards the top. Focal length 30mm, f7.1 speed 80th Sec.


This image did remind me of Patzch work. The way the light was caught on each trunk was intriguing and brought the image to life. The HDR effect lifts the colour from the original and increase the depth of the whole image. Focal length is 18mm with a f.stop of 7.1 100th second.


I took this image for the highlights caught on the top of the bars of the metal gate. This then allows the eye to be drawn along the fence and road into the centre of the composition. The HDR effect really helps lift this composition, this can be seen in the fields in the background just before the sky, they have far more definition and generally warms up the whole composition. I wanted as much of the background in focus so I used a small aperture  f18, this combined with a wide angle 22mm, speed 160th sec.


I found this odd looking piece of dead wood, the sunlight was catching the right-hand side. I made a slight mistake with this shot. I used a shallow depth of field to hide some of the background that is slightly confusing. However, the HDR effect as well as adding dept to the central image brings back some of the background. Sometimes HDR is not suitable for some images. Lens 18 to 70mm, length 20mm, f stop 2.8 speed 125th sec.


This last image was taken for the positon of the large rock in the foreground in relationship to the hill in the background. I wanted to capture the stream and wanted a different look from the other images. Yet again the spots of highlights captured in the stream make for a more interesting composition. It was also a misty morning, this has helped with the lighter tone at the top of the image. I chose a wide focal length of 20mm in combination with an aperture of f11, speed 100th second.


Learning outcomes:

1. HDR or Not HDR. For me the jury is out. The over use of this effect, fake or bracketed camera technique is all for here to see. My own belief is if the eye can not see this in the real world then what purpose does it serve. If the use is for clarity then I can see the reasons why you would want to use it in a subtle way. Yet again I can appreciate that if the reason for using it was to produce a more graphic lead image then HDR is ideal.

2. I enjoyed going out in search of spots of light and unusual shapes, along with trying to always take images with foreground interest that lead the eye.

3. At this stage of learning its so important not to restrict your image taking. There are great images to be had what ever genre of photography that interests you.

4. There are some very talented Photoshops practitioners. To come up with a very simple technique to convert a non bracketed photographer into a HDR photograph. Sometimes you will come across an image you believe would convert well to HDR but don't have a tripod or able to hold the camera still. This technique will help. Visit this link http://www.flickr.com/photos/kolnedra/2257529395/


Contact Sheet:


Wilderness Part two


Introduction

I wanted to use some of the learning's from semester 1 and carry them over into semester 2. I also wanted to carry on linking the research and writing's from the essay module through to the Photographic assignments. With this in mind I wanted to create a set of images that have been influenced by Karl Blossfeldt - see image above.

The main idea came from the trip to North Wales at Easter. My daughter wanted to collect various items to make a nature table. I thought it would be a good idea to capture these items on film.

To achieve this I need to control light. I constructed a light tent from an old McCain fries box picked up at Tesco. I cut out a section at the back and covered it with white card to allow light in, and cover the sides and top in black card. I also made a reflector out of some tinfoil and card. The purpose of the light tent is to create a bright background reflecting ambient light back from the front. The black card absorbs light creating a nice outline around the object and controls shadow.


With all the images below I have used the aged photo preset in Lightroom as a foundation effect. I have then increased the 'black', 'contrast', and 'clarity'. I have then moved the temperature' and 'saurations' slide until the desired effect has been obtained. 


Pine Cone collected at Dolhendra Wood
Camera Nikon D300
Lens Sigma 28mm prime lens
ISO 100
f.11
20th second


Woodland Fern  collected at Dolhendra Wood
Camera Nikon D300
Lens Sigma 28mm prime lens
ISO 100
f.11
20th second


Small pine tree branch picked up at Dolhendra Wood
Camera Nikon D300
Lens Sigma 28mm prime lens
ISO 100
f.11
10th second


Bramble twig that has wool caught on it at Dolhendra Wood
Camera Nikon D300
Lens Sigma 28mm prime lens
ISO 100
f.11
13th second


Pine tree branch collected at Dolhendra Wood
Camera Nikon D300
Lens Sigma 28mm prime lens
ISO 100
f.11
20th second


Small twig with fungus and moss growing on it collected at Dolhendra Wood
Camera Nikon D300
Lens Sigma 28mm prime lens
ISO 100
f.11
20th second


Razor Clam shell collected at Barmouth Beach North Wales
Camera Nikon D300
Lens Sigma 28mm prime lens
ISO 100
f.13
20th second


Seagull Feather collected at Barmouth Beach North Wales
Camera Nikon D300
Lens Sigma 28mm prime lens
ISO 100
f.8
25th second


Dried Seaweed collected at Barmouth Beach North Wales
Camera Nikon D300
Lens Sigma 28mm prime lens
ISO 100
f.3.5
25th second


Leaning outcome:

1. A box and a bit of cardboard can make an effective light tent. I found it very effective of controlling light and produces a nice fine art images.

2. Collecting objects and photographing them is a good way of cataloguing and creating a photo journal of your travels and places you visit.


Contact Sheet:


Burnt Out - Alien


Introduction

Sometimes opportunities just present themselves! For my Alien section of the Places module I had planned to take either the Mosques of Blackburn or sections of the Duralay factory. However, I had been reading Foto8 magazine and saw an article showing the forest fires. Within the same week an area that I regularly walk  had a series of moorland fires. I was struck by the colour of the burnt out undergrowth, its wasn't black but had this amazing deep deep blue. This, compared to the greenery of the surrounding area, made for a superb contrast.

I visited this site a couple of times morning and night to ascertain which light effected the burnt out undergrowth the best. My plan was to use the learning's from semester 1 on Magic Hour lighting. In the end it came down to location and which way the sun direction illuminated the area best. These shots were taken in the evening with the sun coming in  at 45 degrees to the burn area. The light just seems to kiss the spiral twigs adding to the depth of the compositions. I purposely chose DSLR due to the colours on offer. I could convert this to greayscale as images in 8 Magazine, but feel this effect would not do the final images justice. I used a low angel for capture, as I wanted to give the impression of a large area of burnt moorland. I used a 28mm lens which on a 3/4 frame camera provided a standard view - the nearest to how the eyes see. 
I wanted to blur the background to create a plain coloured canvas to accentuate the contracts between the burnt and non burnt out areas. To achieve this all the images have an f.stop of around f4. ISO is set to 280. The images on blogger (here) are not a punchy as the ones in Lightroom, they have lost a little depth when converting to Jpeg and reducing the quality to reduce file size.


Image Details:

Nikon D300
speed 100th second
f.stop f3.2
ISO 280
28mm prime lens


Image Details:

Nikon D300
speed 100th second
f.stop f4
ISO 280
28mm prime lens


Image Details:

Nikon D300
speed 100th second
f.stop f4.5
ISO 280
28mm prime lens


Image Details:

Nikon D300
speed 100th second
f.stop f3.2
ISO 280
28mm prime lens


Image Details:

Nikon D300
speed 100th second
f.stop f3.2
ISO 280
28mm prime lens


Image Details:

Nikon D300
speed 100th second
f.stop f4
ISO 280
28mm prime lens


Leaning Outcome:

1. When opportunities present themselves get off your bum and take them.

2. By visiting a place a number of times visualising the compositions you are likely to take helps plan the session to come. It also make you work in a different way. I have been working with Large Format, the process is slow and methodical and you are restricted by the number of shots you can take. This stops the fire gun approach to photography that is prevalent with DSLR. Taking large amounts of images and hoping some turn out. With this session I limited myself to as few a shots as possible. In the end I only took six (see above). Spending time on site and slowing everything down can be, in certain circumstances,  the best way to work.

Dale Steet - Medium Format Film Camera

Background:

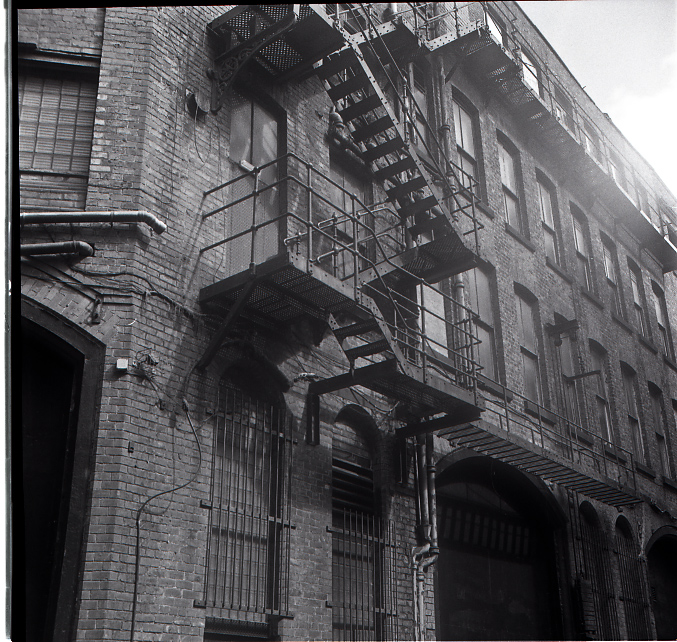
As part of the 'Places' assignment there was an option to use a medium format camera and produce 1 roll of film in the form of black and white prints. I have gone somewhere in between. I have used my trusty old Rolleicord 120 camera to produce  a set of images of Dale Street in Manchester, but decided to scan the negatives in  digitally.

Dale Street is in the Northern Quarter of Manchester that is going through a major face lift. I had worked in this area for about 7 years and always said I would go back and photograph it. Dale Street has always been synonymous with the rag trade and many of the buildings have not changed since being built at the time of the industrial revolution.


I wanted to keep within the look and feel of this area so I purposely chose the Rolliecord to captured these images. The day for this session was sunny and bright which has caused some issues with flare. The image above was taken looking down the length of Dale Street, its only the cars that can date this picture.


This image is of the old JD Williams building on Hilton Street that runs parallel to Dale Street. This photography does not do this door way with its arch and small glass  panels justice. It's somewhat spoilt by the VW car and parking sign on the wall.


Just a few yards on from the archway door is the side of the old JD Williams building that have now been turned into flats. This building has a beautiful  art deco fascia restored to its former glory.

The following images are all taken on Dale Street:


Must remember to wind the film on!!

Camera Rolleicored
Film Ilfod HP5 400
Shutter Speed 125th sec
Aperture between f22 and F11 (you don't get a lot of choice for a large d.o.f on a Rolleicord - its either f22 of fll, or move the dial somewhere in between and hope for the best!
Saturday 1st May 2010


Learning Outcomes:

1. To control the flare I will have to make a hood for the Rolleicored

2. These old medium format cameras add something in the right situations. Yes you would have got clearer shots and more detail with DSLR, but somehow I don't think it has that creative quality.

3. Remember to wind on the film - I lost 3 on this roll.

4. Still think there are to many cars around spoiling our shots!!