The list of books below are the main referencing for this assignment, along with my written dissertation;
Hicks and Schultz/2000/Darkroom Basics and Beyond/Collins and Brown/London
Blakemore/2008/Black and White Photography Workshop/David and Charles/Cincinnati
Langford/1999/The Darkroom Handbook/Ebury Press/London
James/2008/The Book of Alternative Photography/Delmar/New York
AOP/2003/Beyond The Lens/The Association of Photographers Limited/London
Internet
http://www.harmanexpress.com
http://www.alternativephotography.com/wp/
Showing posts with label Professional Practice. Show all posts
Showing posts with label Professional Practice. Show all posts
Monday, January 16, 2012

Whats Next - Professional Practice
I have further experimented with salt prints. However, I'm still not getting enough detail into the image. I had a thought of using a digital scan of the original neg and a scan of the salt print and combining them in photoshop. I discussed this with the lecturing staff (Andy) to see if this could be achieved. Well, Andy suggested why not experiment around a bit. He merged the two images but slightly out of alignment, which created a shadow effect. This has shown the possibilities that can be used. I kind of like the thought of using different photographic processes for the different era of photography. The image below has been taken with an 1850's petval lens. The film is Adox CHS, the same production as in the 1950's. Developed with Rodinal developer, then digital scanned. Finally imported into photoshop and digitally enhanced. This is definitely another avenue I would like to explore.

The Final Images - Professional Practice
The final images for the Professional Practice are presented below. I am pleased with the results and feel I have moved on in my own photographic practices. Following on from the Final Major Project in year 2, I have experimented with both creative and photographic techniques.
These included:
- Theory gained in writing my dissertation has been applied in the capture of these images. I was somewhat reluctant to use a digital process in this assignment, wanting a purely analogue approach from concept to presentation. However, information gained from both research and provided by professional photographs changed my mind.
- I have used old photographic lenses that produced a certain effect in combination with modern large format cameras, combining this with film of the 1950's. This was in search of a different aesthetic look from the conventional photographic practices.
- When printing the images consider low-fi, this can produce innovative images that are different from convention. Experiments with various papers not considered the norm e.g brown paper, graph paper and tracing paper, these provide very interesting and exciting images.
- I have never submitted a full film portfolio. I have researched different film types, and chose one for the certain look it provides and then used appropriate developer and fixer so the best and stable results can be obtained.
- I chose a theme (The Beauty in Death and Decay) that would meet external competition brief criteria. The images below I feel could be entered into a number of competitions that are currently running. I will definitely enter the AOP Student awards in the Still Life Category. The other is the Black and White Spider awards.


Petval Lens - Professional Practice
In the final experiment for the Professional Practice I had taken two shots using a 1800's Petval lens. The lens in question is extremely fast at f2.8. To have a workable shutter speed (as the petval has no shutter) a combination of shutter and aperture would be around 2 seconds. So that I could control light better I workman like taped a 4 stop filter to the front of the lens. Taking a lightmeter reading I could then work out when the light coming into the room was appropriate. The images below show the amazing swirly bokeh you are able to obtain with these fantastic old lenses.


Ink Aid - Professional Practice
If you want to print on hand made paper there is a fantastic product called ink aid. This product came to my attention when experimenting with handmade paper for my professional practice assignment. One of the lecturing staff noticed how dull some of the images were printing. This is caused by too much ink penetrating into the paper fibres, causing loss of detail. Ink Aid produce a product that allows you to coat a whole host of substrates prior to ink jetting. By using a sponge brush simply take a small amount of ink aid and coat the paper with vertical lines. Follow this by brushing horizontal lines. Allow to dry for 24 hours and repeat the process to give the paper a second coat. Allow to try for 24 hours and then you are ready to print.
There is a definite improvement to image detail when ink aid is used. It's a pity this can't be shown on the print produced - you'll just have to take my word for it.


Market Research - Professional Practice
What to do with the final image is the hardest part of the Professional Practice assignment. The type of photography that both interests me and that I produce falls into the fine art category. This is arguably the hardest to break into. When researching the market for fine art photography the photographer has two main choices. To sell at a low cost but higher sales in small local galleries, or high cost but low sales in large city galleries. The smaller galleries offer a better chance of work being carried but also carry the stigma of labelling the photographer as a lower worth (not personally). Large galleries are nigh on impossible to carry your work unless you have a reputation.
Other avenues open for the fine art photographer are large establishments such as hospitals, hotels or office complexes. Target any new build, find out who the facilities buyer is and ask for an appointment. All new buildings will carry some form of pictures whether that paints or photography. Find out who is the decisions maker for purchase and make contact.
Agents are another way the photographer can get images carried in both galleries and large establishments. They will take a commission for every image sold but have an array of contacts. There are a number of good agents around the UK and for the really proactive photographer look at the USA.
Winning competitions is probably one of if not the best way into all that I have described above. Winning or being placed in one of the many national or international competitions opens all kinds of doors for you. This is why entry is so high and quality is so good.
The other avenue is education. As photographers I feel we have a responsibility to part with our knowledge to the next generation. Although there will be a small number who are interested in the alternative practices of yesteryear, we must keep the candle burning before they become lost to us all. Arguably alternative practices still provide some of the best fine art photography produced, and definitely the accidental master piece!
Tuesday, December 27, 2011
The printing of images - Professional Practice
This subject came about from a conversation I had with lecturing staff (Katy) when scanning in negs and the salt printed images. The debate was around the finished image and how in the digital age we seemed to have lost sight of how to present the image in a paper form. This led to an afternoon of experimenting with images produce in a low tec format by use of the photocopier. This was also used in combination with different papers that you don't normally associate with photography. Some of the papers were also a bit low tec, brown envelope, tracing paper to name a few.

This all led to me purchasing a number of sheets of handmade coloured paper to experiment with. I also purchased quality brown paper, graph paper and some tracing paper. I produced a number of prints to see what kind of effect they would produce. Examples below:


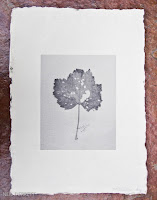


The coloured paper prints give a nice aesthetic finish. However, the make up on the paper make it hard to print on the laser jet printer. I have borrowed a bottle of Ink Aid which is a pre coating solution for ink jets. Hopefully this will help in the image stability on the handmade paper.

This all led to me purchasing a number of sheets of handmade coloured paper to experiment with. I also purchased quality brown paper, graph paper and some tracing paper. I produced a number of prints to see what kind of effect they would produce. Examples below:


The coloured paper prints give a nice aesthetic finish. However, the make up on the paper make it hard to print on the laser jet printer. I have borrowed a bottle of Ink Aid which is a pre coating solution for ink jets. Hopefully this will help in the image stability on the handmade paper.
Professional Practice - Concept for the Main Theme
After a lot of deliberation and experiments with different film I finally came to decide on how to proceed with the Professional Practice assignment. The theme for the set of images is 'death and decay'. Since I began at UCBC I have been a great admirer of New Objectivity. I love the way photographers who follow the characteristics of this movement chose subjects out of the ordinary, the items that most of us consider as unimportant. I am fascinated how plants change with the seasons. The end of a plant's life takes on an amazing transformation. As areas of the plant cling to life other areas wither and drain away. Other plant forms produce different transformations. The teasel head changes from small purple flowers covering into a spiky dried intricate form. Its these transformations that produce shape and forms that I intend to capture.
Below are the initial images - They will naturally fit into the still life sections of photographic competitions.


Below are the initial images - They will naturally fit into the still life sections of photographic competitions.


Salt Printing Experiment - The Final Image

The above image was exposed to direct sun for 10 mins. However, the windows at Uni have a UV protection. I believe this has effected the overall print as I should have taken the contact frame outside. For future if I exposed inside the uni building I would double the time. I am pleased with the look and feel of the image. More clarity is required with the fine detail, this including some of the mid tones and shadow detail. Selection of a good contrasting negative is key to making a good salt print. This is one process that I will continue to experiment until I become proficient. Much much more practice required.
Thursday, December 1, 2011
Salt Printing Experiment - Part Three
Part 3 of the Salt Printing Experiment is the fun bit. After preparing the paper and light sensitve solution you can comence the contact printing.

The first part of the process is to coat the sized paper with the light sensitive solution. This is achieved by clamping the paper by one edge to prevent movement. Place the glass rod spreader at the clamped edge. With a syringe take approx 5m of the silver nitrate solution and run a thin bead along the spreading rod. Run the rod to the other edge of the paper, at the end lift and then place back on the paper and run back towards the clamped end. Repeat this twice. On the last run lift the rod and wipe clean. Allow the paper to dry fully. This stage can be sped up by the use of a hair dryer. When completly dry select a suitable negative and place on top of the paper emulsion side down and mount in a contact printing frame. Place in direct sunlight for 10 to 15 mins.


The last stage is to develop the paper. This is quite a long process compared to modern silver based processes. 5 trays are required:
Tray 1 3% Salt bath: 30g kosher salt, 1 litre distilled water and 10g citric acid - 5 minutes
Tray 2 Wash bath: clear water - 15 minutes -
Tray 3 10% Sodium Thiosulfate fixing bath: 100g sodium thiosulfate, 1 litre distilled water and 2g sodium bicarbonate - 30 to 60 seconds
Tray 4: Hypo Clearing Bath: 10g sodium sulfite and 1 litre distilled water - 3 minutes
Tray 5: Final Wash - 20 minutes

Salt Printing Experiment - Part Two
Part two of the Salt Printing experiment is to make a light sensitive solution that will coat the already sized paper. This is achieved by using Silver Nitrate. This chemical has to be respected, if used inappropriately Silver Nitrate can burn and if it comes into contact with the eyes in the worst cases it can blind. It is advisable to wear safety equipment such as surgical gloves and protective eye wear.

To make the light sensive solution you require 100ml of distilled water, 10g of silver nitrate and 5g citric acid. Mix the silver nitrate with half of the water which has been warmed. Poor this into a dark medicine bottle. Mix the citric acid in the remaining water and carefully pour into the medicine bottle. The solution is ready to use. The citrc acid in the solution lowers the ph of sensitizer and acts as a preservative.

10g of silver nitrate

Light sensitive solution
Tuesday, November 29, 2011
Salt Printing Experiment - Part One
As this was my first foray into salt printing the initial starting point is to obtain all the chemicals, and there are quite a few!! Its not just the chemicals, there are other specialist bits and pieces required, syringes, coating rods and specialist paper.


With any new photographic discipline knowledge is sort. This came by way of an excellent book by Christopher James 'The Book of Alternative Photographic Processes" pages 34 to 59.
The first part of the process is to size the paper that will be contact printed. Most bought water colour paper is already sized, however James always recommends a sizing stage of the process to ensure consistent results.

The sizing process consists of coating water colour paper, or any other paper that you are using for that matter, with a solution of gelatin and salt. To make 1 litre of sizing solution you will require 8g gelatin, 18g of sodium citrate, 20g of ammonium chloride and 1 litre of distilled water.

8g of photographic gelatin

Gelatin bloom
The first step is to soak the gelatin in 500ml of the distilled water. This takes approx 15 to 20 minutes. This is known as the bloom stage. Add the remaining water and heat to 100 f. When the mixture reaches the required temperature mix in the other chemicals.

Prepare a double boiler bath - a smaller tray that fits into a larger tray. This is to maintain temperature while the paper soaks in the sizing solution. Gelatin will revert to a hardened state if allowed to cool. Feed the paper in one sheet at a time allowing to soak for between 3 and 5 minutes.

Hang the paper in a dry dust free environment allowing to dry fully before using - approx 24 hours.
Friday, November 25, 2011
Professional Practice - Silverbased Test 5
For the final experiment for this assignment I wanted to try Adox film. This film was first produced in the 1950's and is an old school type. The emulsion has a certain special sensitivity "partial panchromatic' halfway between ortho and true panchromatic.

Adox film has to be treated slightly differently form the modern day film. The emulsion is quite delicate and has to be handled with a little more care. When developing, the sheet film has to be pre-soaked for 5 minutes in water which softens the emulsion.

The developer used was Rodinal 09 which is more suited to this film than the Ilford developer I normally use. I used the Paterson Orbital Processor as with the other test previously carried out. I did have a slight moment when the developer came out deep rose colour.


Adox film has to be treated slightly differently form the modern day film. The emulsion is quite delicate and has to be handled with a little more care. When developing, the sheet film has to be pre-soaked for 5 minutes in water which softens the emulsion.
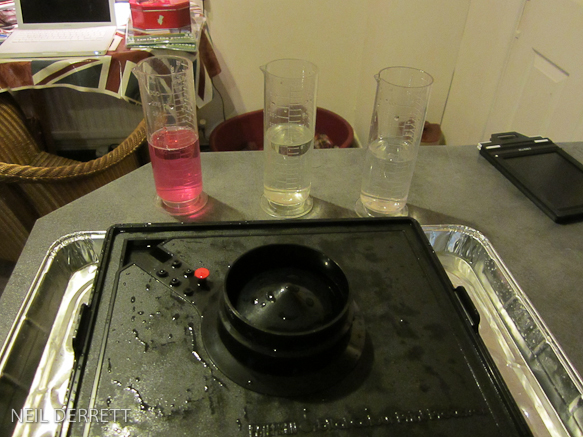
The developer used was Rodinal 09 which is more suited to this film than the Ilford developer I normally use. I used the Paterson Orbital Processor as with the other test previously carried out. I did have a slight moment when the developer came out deep rose colour.

Pre soak 5 mins 20c water temp
10 mins developing 20c
60 Sec just water 20c
5 mins Ilford Rapid Fix 20c
20 mins wash 20c
The samples of this film are below:


Subscribe to:
Posts (Atom)