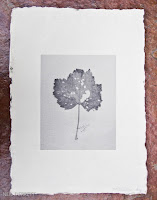
This subject came about from a conversation I had with lecturing staff (Katy) when scanning in negs and the salt printed images. The debate was around the finished image and how in the digital age we seemed to have lost sight of how to present the image in a paper form. This led to an afternoon of experimenting with images produce in a low tec format by use of the photocopier. This was also used in combination with different papers that you don't normally associate with photography. Some of the papers were also a bit low tec, brown envelope, tracing paper to name a few.
This all led to me purchasing a number of sheets of handmade coloured paper to experiment with. I also purchased quality brown paper, graph paper and some tracing paper. I produced a number of prints to see what kind of effect they would produce. Examples below:
The coloured paper prints give a nice aesthetic finish. However, the make up on the paper make it hard to print on the laser jet printer. I have borrowed a bottle of Ink Aid which is a pre coating solution for ink jets. Hopefully this will help in the image stability on the handmade paper.
Tuesday, December 27, 2011
Professional Practice - Concept for the Main Theme
After a lot of deliberation and experiments with different film I finally came to decide on how to proceed with the Professional Practice assignment. The theme for the set of images is 'death and decay'. Since I began at UCBC I have been a great admirer of New Objectivity. I love the way photographers who follow the characteristics of this movement chose subjects out of the ordinary, the items that most of us consider as unimportant. I am fascinated how plants change with the seasons. The end of a plant's life takes on an amazing transformation. As areas of the plant cling to life other areas wither and drain away. Other plant forms produce different transformations. The teasel head changes from small purple flowers covering into a spiky dried intricate form. Its these transformations that produce shape and forms that I intend to capture.
Below are the initial images - They will naturally fit into the still life sections of photographic competitions.
Salt Printing Experiment - The Final Image
The above image was exposed to direct sun for 10 mins. However, the windows at Uni have a UV protection. I believe this has effected the overall print as I should have taken the contact frame outside. For future if I exposed inside the uni building I would double the time. I am pleased with the look and feel of the image. More clarity is required with the fine detail, this including some of the mid tones and shadow detail. Selection of a good contrasting negative is key to making a good salt print. This is one process that I will continue to experiment until I become proficient. Much much more practice required.
Thursday, December 1, 2011
Salt Printing Experiment - Part Three
Part 3 of the Salt Printing Experiment is the fun bit. After preparing the paper and light sensitve solution you can comence the contact printing.
The first part of the process is to coat the sized paper with the light sensitive solution. This is achieved by clamping the paper by one edge to prevent movement. Place the glass rod spreader at the clamped edge. With a syringe take approx 5m of the silver nitrate solution and run a thin bead along the spreading rod. Run the rod to the other edge of the paper, at the end lift and then place back on the paper and run back towards the clamped end. Repeat this twice. On the last run lift the rod and wipe clean. Allow the paper to dry fully. This stage can be sped up by the use of a hair dryer. When completly dry select a suitable negative and place on top of the paper emulsion side down and mount in a contact printing frame. Place in direct sunlight for 10 to 15 mins.
The last stage is to develop the paper. This is quite a long process compared to modern silver based processes. 5 trays are required:
Tray 1 3% Salt bath: 30g kosher salt, 1 litre distilled water and 10g citric acid - 5 minutes
Tray 2 Wash bath: clear water - 15 minutes -
Tray 3 10% Sodium Thiosulfate fixing bath: 100g sodium thiosulfate, 1 litre distilled water and 2g sodium bicarbonate - 30 to 60 seconds
Tray 4: Hypo Clearing Bath: 10g sodium sulfite and 1 litre distilled water - 3 minutes
Tray 5: Final Wash - 20 minutes
Salt Printing Experiment - Part Two
Part two of the Salt Printing experiment is to make a light sensitive solution that will coat the already sized paper. This is achieved by using Silver Nitrate. This chemical has to be respected, if used inappropriately Silver Nitrate can burn and if it comes into contact with the eyes in the worst cases it can blind. It is advisable to wear safety equipment such as surgical gloves and protective eye wear.
To make the light sensive solution you require 100ml of distilled water, 10g of silver nitrate and 5g citric acid. Mix the silver nitrate with half of the water which has been warmed. Poor this into a dark medicine bottle. Mix the citric acid in the remaining water and carefully pour into the medicine bottle. The solution is ready to use. The citrc acid in the solution lowers the ph of sensitizer and acts as a preservative.
10g of silver nitrate
Light sensitive solution
Tuesday, November 29, 2011
Salt Printing Experiment - Part One
As this was my first foray into salt printing the initial starting point is to obtain all the chemicals, and there are quite a few!! Its not just the chemicals, there are other specialist bits and pieces required, syringes, coating rods and specialist paper.
With any new photographic discipline knowledge is sort. This came by way of an excellent book by Christopher James 'The Book of Alternative Photographic Processes" pages 34 to 59.
The first part of the process is to size the paper that will be contact printed. Most bought water colour paper is already sized, however James always recommends a sizing stage of the process to ensure consistent results.
The sizing process consists of coating water colour paper, or any other paper that you are using for that matter, with a solution of gelatin and salt. To make 1 litre of sizing solution you will require 8g gelatin, 18g of sodium citrate, 20g of ammonium chloride and 1 litre of distilled water.
8g of photographic gelatin
Gelatin bloom
The first step is to soak the gelatin in 500ml of the distilled water. This takes approx 15 to 20 minutes. This is known as the bloom stage. Add the remaining water and heat to 100 f. When the mixture reaches the required temperature mix in the other chemicals.
Prepare a double boiler bath - a smaller tray that fits into a larger tray. This is to maintain temperature while the paper soaks in the sizing solution. Gelatin will revert to a hardened state if allowed to cool. Feed the paper in one sheet at a time allowing to soak for between 3 and 5 minutes.
Hang the paper in a dry dust free environment allowing to dry fully before using - approx 24 hours.
Friday, November 25, 2011
Professional Practice - Silverbased Test 5
For the final experiment for this assignment I wanted to try Adox film. This film was first produced in the 1950's and is an old school type. The emulsion has a certain special sensitivity "partial panchromatic' halfway between ortho and true panchromatic.
Adox film has to be treated slightly differently form the modern day film. The emulsion is quite delicate and has to be handled with a little more care. When developing, the sheet film has to be pre-soaked for 5 minutes in water which softens the emulsion.
The developer used was Rodinal 09 which is more suited to this film than the Ilford developer I normally use. I used the Paterson Orbital Processor as with the other test previously carried out. I did have a slight moment when the developer came out deep rose colour.
Pre soak 5 mins 20c water temp
10 mins developing 20c
60 Sec just water 20c
5 mins Ilford Rapid Fix 20c
20 mins wash 20c
The samples of this film are below:
Thursday, November 24, 2011
Profesional Practice - Silver based test 4
As part of the experiments I have been conducting I wanted to see what would happen if I used an old petzval lens and film. The lens I used is quite fast at f2.8, and with out a shutter an exposure of around 1 to 2 seconds is sort. The only film I had was ISO 400. This means controlling light becomes an issue. The light for this test was daylight mixed with an ordinary ceiling light behind the camera. For this test I was not overly concerned with any particularly lighting set up, I just wanted enough light so that I could use a combination of film speed, aperture (fixed at 2.8 as I don't own stops for this lens) and time.
The first image was a 2 seconds exposure. The light to the models face is slightly under exposed, plus the camera is casting a shadow over the bottom of the face. At the top of the image is the swirly bokeh that is the signature effect of the petzval lens. The second image was still a 2 second exposure but with the light turned up (dimmer switch controlling ceiling light). Also the model was taller, so the shadow of the camera was cast in the neck area.
Conclusion
This test has proved that I could use this lens in combination with a faster film speed (ISO100 or below) and use the fauna subject mater in previous test to create a distinctive salt prints.
Monday, October 31, 2011
Professional Practice - Competitions
As outlined in the introduction blog to the Professional Practice, part of the assignment is to enter professionally recognised competitions. I'm slightly at odds with this, my professional practice is following a route of alternative photography processes with a subject matter of organic objects and structure. When researching photographic competitions you get the sense that the judging panel are looking for the obtuse, strange and surreal. My choice of subject matter doesn't really fall into this category.
Of the many competitions out there the two main ones of interest are the A.O.P Student awards and the Fuji Student Awards.
A.O.P Student Awards
The AOP Student awards are arguably the most important competitions for students studying at BTEC and above. The good thing is there is no age limit as in other student competitions, so old gimmers like me can enter. Every year over 3000 students enter this competition to win the the coveted award which can take the winners careear way pass the next level. The deadline for this years comp is 27th Jan 2012 and there are four categories split into single image and series. So there should be a least one category that should create some interest.
Categories:
Portraiture & Lifestyle
Fashion & Beauty
Landscape, Exterior and Interior
Still Life
Fuji Student Awards
Another competition particularly interesting to students who prefer film based photography is the Fuji awards. Like the A.O.P the Fuji awards doens't have an age limit, and is aimed at students studying above BTEC. There is only one category and the theme is EXTREME. The student have to interpret this word into an image but must be shot on Fuji Professional Film . The winner wins £200 worth of Fuji film but more importantly has a profesional portfolio produced and promoted. The deadline for this competition is 29th February 2012.
Professional Practise - Siverbased Test 3
After reading John Blakemore's book "Black and White Photography Workshop" in the Uni library, and seeing a diagram for taking still life compositions, I thought I would give it a go and experiment with this set up. There was a range of subjects, a composed basket of sewing items, series of organised buttons and finally three leaves from three different Acer trees. As with the two previous tests the camera was a Sinar F1 with two bellows to extend the focal length to capture enlarged detail. This camera was weighted down on a tripod due to all the weight being front loaded over looking the composition. The lens was a 210mm Schneider Symmar-S, Film Ilford HP5 Plus 400. As these shoots were part of a series of experiments, it was a case of the film being used, as what I had in, than going for a specific creative look.
As with the previous shoot a lightmeter reading was taken and and two shots of each subject were taken with slightly different apertures to vary the depth of field.
Side view as John Blakemore's diagram
View looking down from the camera at subject:
The final images:
As with the previous shoot a lightmeter reading was taken and and two shots of each subject were taken with slightly different apertures to vary the depth of field.
Side view as John Blakemore's diagram
View looking down from the camera at subject:
The final images:
Sunday, October 30, 2011
Professional Practice - Silver Based Test 2
Following on from test 1 I wanted to experiment with a homemade light box. This was simply a cardboard box from a well known supermarket, with the back cut out and a white piece of card stuck in place. The sides and roof had been blacked out with paper and the floor coloured white. The subject was a weed (Rosebay Willow Herb) that I had picked that morning, which was full of drift seed. As you can see from the images below I place the light box next to a window, the plant was roughly six inches away from the background clamped in position. As with test one I was using a 210mm focal length lens with two bellows for that macro composition. A homemade reflector with a hole in the centre for the lens to poke through to add those extra highlights. The camera was positioned roughly a meter away from the light box.
Professional Practice - Silver Based Test 1
Before being able to test out new printing methods as previously described, it would be an advantage to have some decent negatives which to print from. Like the print experiment posts, I want to research different capture techniques. The first test is using a teasel as subject capturing it in natural light. This basic set up can be seen below. By using a roll of lining paper as a back drop and positioning the teasel roughly 5 inches away attached to a barrel, with the camera positioned to the front. Natural sunlight is from above slightly to the right. Two images were taken after taking an incident light meter reading.
Meter reading f5.6 @ 500th Sec
Shot 1. was taken at f5.6 @ 250th Sec. One stop of extra light to counter the recipicale light failure.
Shot 2. was taken at f8 @ 125th Sec. (extended) depth of field. By using these speeds and aperture setting the same amount of light will hit the film plane. The only difference will be the extended detail on the subject - depth of field.
Camera had two bellows for a detailed close up of the teasel to fill the image plane. Lens was 210mm focal length. Film uses was Ilford HP5 Plus 400.
Lens was a Schneider Symmar-S 210mm
The image below has been scanned from the neg but no adjustments have been made. The reason is to show the true potential of the neg for printing in one of the alternative processes already described.
Subscribe to:
Posts (Atom)