A number of students and I organised a practice day to use studio lighting. We wanted to practice light set ups for our 'people' assignment. We had just gone thought the process of researching the different genres of portrait photography and now it was time to emulate some of those examples. The actual images were not the important factor as they would show little of the human condition. The most important was to get the right look for our future projects.
Set up 1:
We had all agreed that we wanted to experiment with Low Key. The diagram above show the simple set up. We had 1 studio light set to continues lighting with a medium size diffuser set at 45/45, with the camera facing the model. This was a technique we all had used in semester 1.
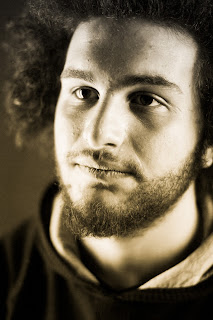
The image above is just one from this session. The lighting is ok but the image is a little flat. A second light adding highlights would have just lifted this image.
Set up 2:
This set up was similar to set up up 1 but with the light coming from behind at a 45 degree angle. We just were experimenting to see what difference the light would have on the model.
Yet again we learnt something here. The light from the back does exactly what it should, light the back of the model. However, the face area is dark and dull. On reflection we should have used a modifier for more dramatic light to the the rear and balanced a second light with diffuser to the front.
Set up 3:
As the above experiments had not really given us what we were after it was time to experiment further.
We had realised that one source of light was not giving the dynamism required. We still used one light but bounced the light source back with a white reflector. To absorb any tray light we positioned a black panel in between the light and reflect as show above. We were still looking to light one side of the face with the other side dark.
This was closer to what we were striving to obtain. The face to one side is lit but has the extra elements of light reflected to create subtle highlights. The shot in lightroom show this a lot better than here on the blog.
We experimented a little further with this set up. We introduced a fluorescent daylight from the left. We had two different colours of light here. Tungsten warm and orange in colour to the fluorescent colder bluer light. This didn't quite work as the contrast of light was too extreme. However, when converting this in lightroom to greyscale, the colours are made redundant but the tone from the daylight add a dramatic highlight.

Time for a change:
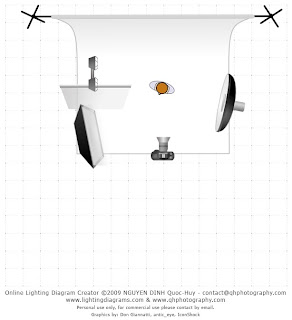
This final set up was something George had wanted to recreate after attended a lighting lecture from Andy. However, it didn't seem to work. We went back to basics and set up one light at a time to see the effect. This was a better way to work and we got to what George was trying to show us.

We had three lights, beauty dish to the right a 45/45 aimed at the top side of the face. The second light was a softbox to the left with a fluorescent light also to the left. This was screened by a foam board to shield stray light. The following images show the images being built up by light source.
The first light source was the lightbox from the left. Next light to be added was the fluorescent daylight, followed by the beauty dish. We ran out of time before really experimenting with the strength of lights. However, what can be seen is the thin strip of detailed highlight running down the left hand side of the model. The beauty dish needs to be turned up to balance the light on the face to the right as it is a little dark.
Learning Outcomes:
1. This day was all about experimenting with light. Some of these set ups just didn't work. However, the learning curve was superior to if we had stumbled on to the most amazing light set up at the first go. Recreating it would be very difficult without fully understanding why it worked in the first pace.
2. It was a great exercise not to concentrate on framing or posing but just to concentrate on the way the light effects the model.
3. I have learnt so much form these experiments, this really gave me the impetus to try more set ups to see how they work.
Contact Sheet:


No comments:
Post a Comment